Friday, June 24, 2016

Planning for solar power

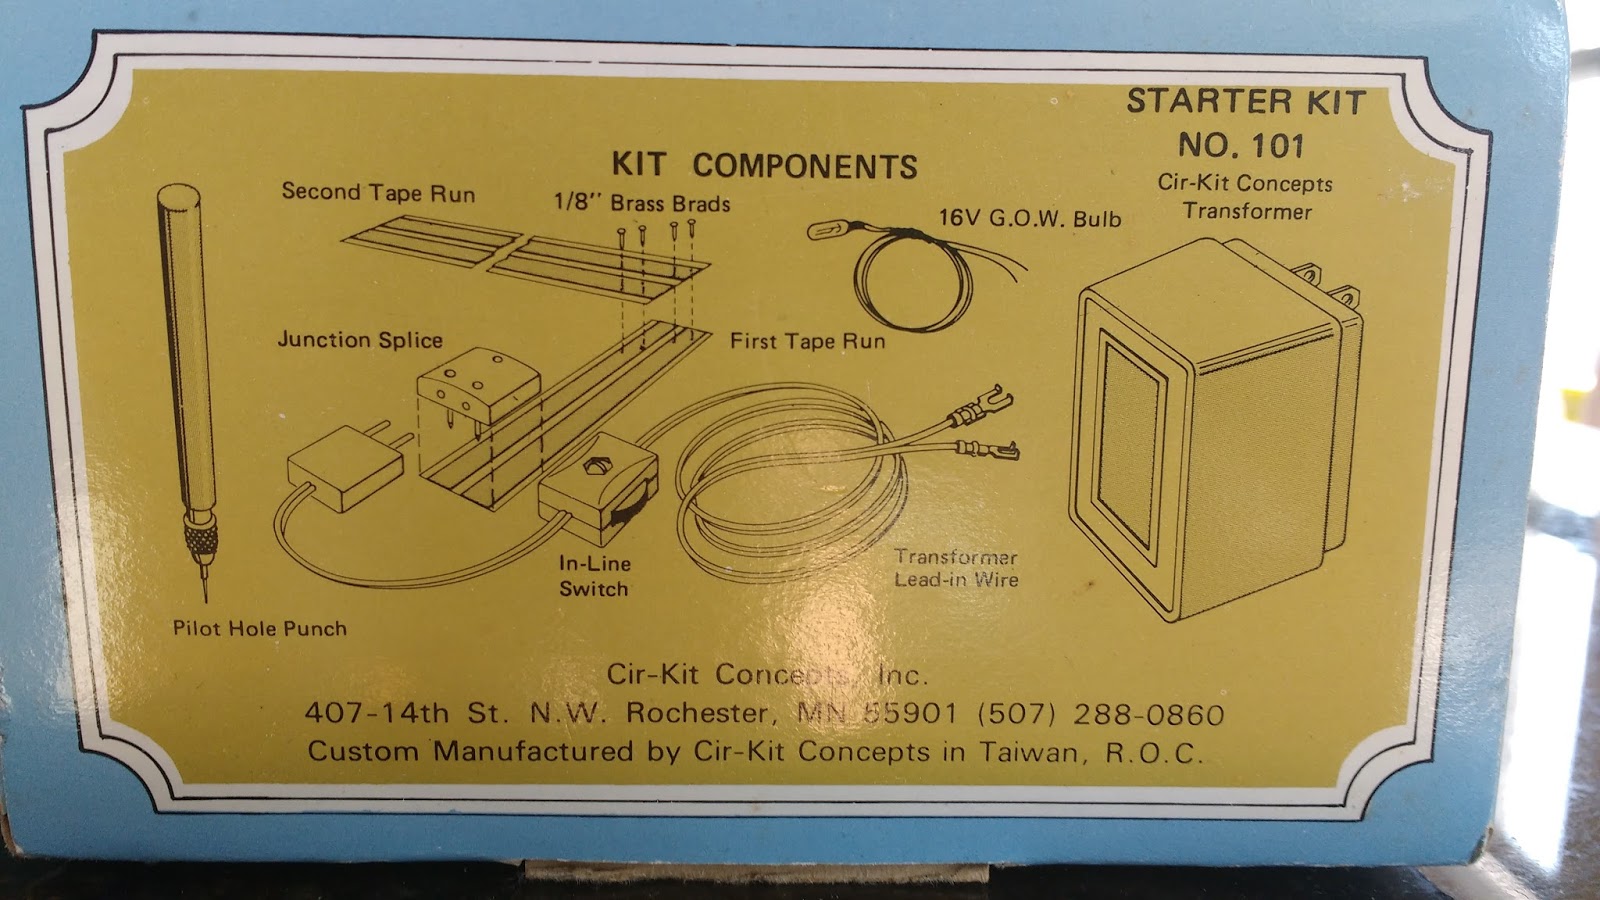
I knew almost from the beginning that I wanted some sort of solar power in the very tiny house. I ended up ordering all sorts of things that I'm not actually going to use. For example, my initial Googling told me that virtually everyone who electrifies a dollhouse uses a Cir-Kit dollhouse wiring kit that comes with essentially everything you need for wiring, except the light fixtures themselves. I knew I had to decide right away, since the wiring needs to be installed before installing the flooring and wallpaper.

cir-kit dollhouse wiring kit for dollhouse electricity

These are a bit steep in price if you buy them new, but I was able to find one on eBay for quite a bit cheaper, so I'd recommend looking there first. It looks rather vintage, but it seems to have everything that's in the new ones. I also found a tutorial for using the Cir-Kit system with solar panels.


Ultimately, though, I'm not going to use the kit for this house. It's major overkill for a house with one tiny living area, a bathroom, and a loft. I'll either resell it or save it for a future project. I did include a link to one on Amazon below this post since they seem to be the industry standard and may be useful if you're building a larger house.


(I also bought a soldering iron and solder, only to find out later that my husband has one from a Sparkfun electricity kit he bought a few years ago. He had no idea it was there).

Once again, I'll be working without a kit, so I purchased and dissected a motion-detecting solar garden light.  You can also buy solar circuit components separately, but this seemed like the cheapest option (and bonus, I get to see how an actual legitimate circuit is wired). I've removed the solar panel, the circuit board, the panel of LED lights, and the battery, and I think I will be able to desolder the motion detector and use the LED panel to create a miniature chandelier. This might be wishful thinking, since I know next to nothing about electricity and circuit boards, but it's worth a try.

disassembled solar garden light

My backup plan is to fashion something like this LED bike light, except, of course, the battery will be solar powered, and the LEDs will hang down into the main living area of the house. Easy, right??


Thursday, June 23, 2016

Dollhouse flooring from coffee stirrers

Did you know that you can buy a box of 1000 coffee stirrers on the internet? I made custom hardwood flooring for the very tiny house, and I've barely made a dent in the box.


It seems relatively common to create dollhouse hardwood flooring with craft sticks or tongue depressors. I decided to use coffee stirrers since they are a bit narrower and seemed more appropriate for the very tiny house. I'll be using the tongue depressor method for wall paneling, however.


No tutorial is really necessary here. I stained the coffee stirrers with a walnut gel-stain and glued them down with tacky glue. You might be able to glue the stirrers down first and then stain; I did not, since I'm not sure if this would cause the flooring to warp. The staining is a bit uneven, but I think this gives it that reclaimed-wood look that's so popular with the life-size tiny house crowd. Or at least that's what I'm going with.

When gluing, I started at the back and worked my way forward, careful to keep the stirrers relatively tight and the alignment at least visually even. Work from the centers outward and try to stagger the seams.

And a few hours later, you'll have somewhat realistic hardwood flooring! I've still got to do the same thing for the loft, but I think I'm off to a good start.


Floor plan

As I mentioned in my first post, the very tiny house's floorplan is based off of this real plan for a life sized tiny house; it's just scaled way down to 1:12 (where 1 inch = 1 foot).

Note the disclaimer on the real plans:
These house plans were not prepared by or checked by a licensed engineer and/or architect. TinyHouseDesign.com does not represent or imply itself to be a licensed engineer and/or a licensed architect. Enjoy these free house plans but use them at your own risk. :-)
So be warned: the very tiny house may not be structurally sound enough to live in! We shall forge onward anyway. ;) There will be a loft on the right side, and the bathroom will be underneath the loft. I plan to put a small bench and table next to the window on the left side of the house, and the kitchen will fall between that seating area and the bathroom...which you can see in this very technical drawing.


As you can see, the floorplan is quite simple. I went with an 8"x15" footprint rather than 8"x16", since my binder board was only 15 inches wide and I didn't really need that extra inch anyway. I didn't inset the door, either. Here, you can see a very rough, not-to-scale drawing of the pieces I cut from the binder board.


The back of the dollhouse is the long low sixteen-foot wall, and the opening of the house is the tallest wall. I'd really like to add this wall on a hinge, with a big window in the front. For now, I'm just keeping that option in mind. So far, I've glued together the floor, side, and back walls, and will add the roof and hinged walls once the interior is a bit more complete.

Wednesday, June 22, 2016

A very tiny house

Here it is- my first ever miniature house! As you can see, it's a work in progress inside my  real tiny house, the small one-bedroom apartment that I live in with my husband and cat. This makes for a messy, multi-purpose workspace, but it gets the job done.


I'm making this house without a kit, without power tools, and without a dedicated workspace. I've found some great tutorials online, and hope to make some of my own as the house gets further underway. I've already begun thinking about my next project, too. I really like the modern Brookwood kit by Greenleaf.

For this house (which is obviously not the Brookwood), I began by searching for "free tiny house plans" and found this one from tinyhousedesign.com. I've modified the plan slightly; my house doesn't have an inset door, and is 8x15 instead of 8x16 (and that's inches for me, rather than feet). I'll include some rough drawings of my floorplan in a future post. 

My house's walls and floors are made from binder's board purchased at Blick. (cheaper version linked below). This was cheaper than the balsa or basswood typically used for model building, and I thought it might be easier to work with since an Exacto knife is my primary tool. 

And that's how the very tiny house began! I glued the base and three walls together with tacky glue, laid down the floor, and began framing the windows. A tiny house just doesn't feel complete without solar panels, so the biggest challenge may be the solar powered LED chandelier I plan to add to the main living area. More to come!